General
Learn how to properly customize and update theme.
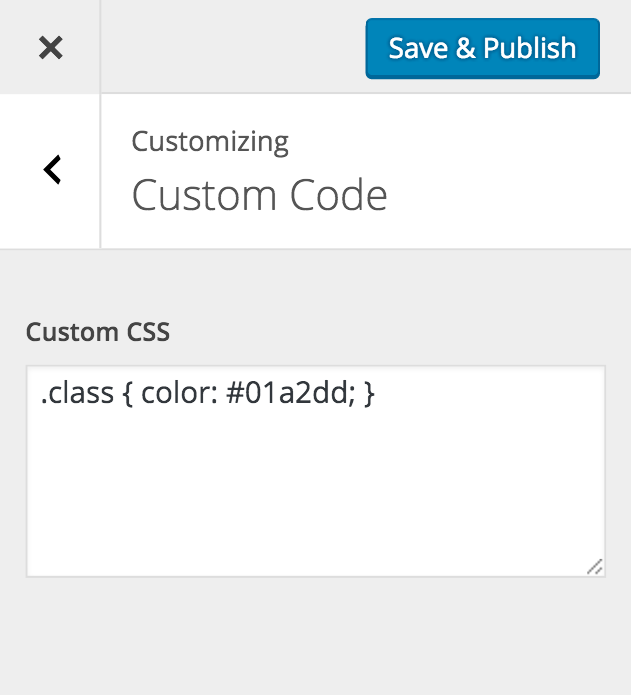
Theme Customization
Add custom style
Add / Modify php code
Whenever the update from Bateaux Theme, all you modified code in the php original template files will be lost after the update. We suggest you to install a child theme instead, for full customizability without losing a single line of code. You can overwrite function which has if ( !function_exists( 'some_function' ) ) command by declaring it in the function.php in the child theme, and also be able to add_filter( ) to wherever the code which apply filter. Here's the useful link about how to use add_filter function.
Child Theme
If you are planning to modify php code, we suggest you to install a child theme instead for editing the files inside the Bateaux theme folder. Below lists are some useful links you can find before using child themes.
Theme Update
Notice : After update all your modification within the original template files in the bateaux theme folder will be lost. We suggested you to do the modification via child theme.
Auto Update (Recommended)
This is the most convenient way to update the theme. This will make you stay updated, no matter how many releases will come in the future.
- Step 1 Install and activate plugin Envato Market which bundled within the theme.
- Step 2 Go to Envato Market menu, add follow that instruction explained in that page.
Manual Update
- Step 1 Delete theme from Appearance > Themes by activating a different theme (ex.TwentyFifteen).
- Step 2 Reinstall the theme like shows here
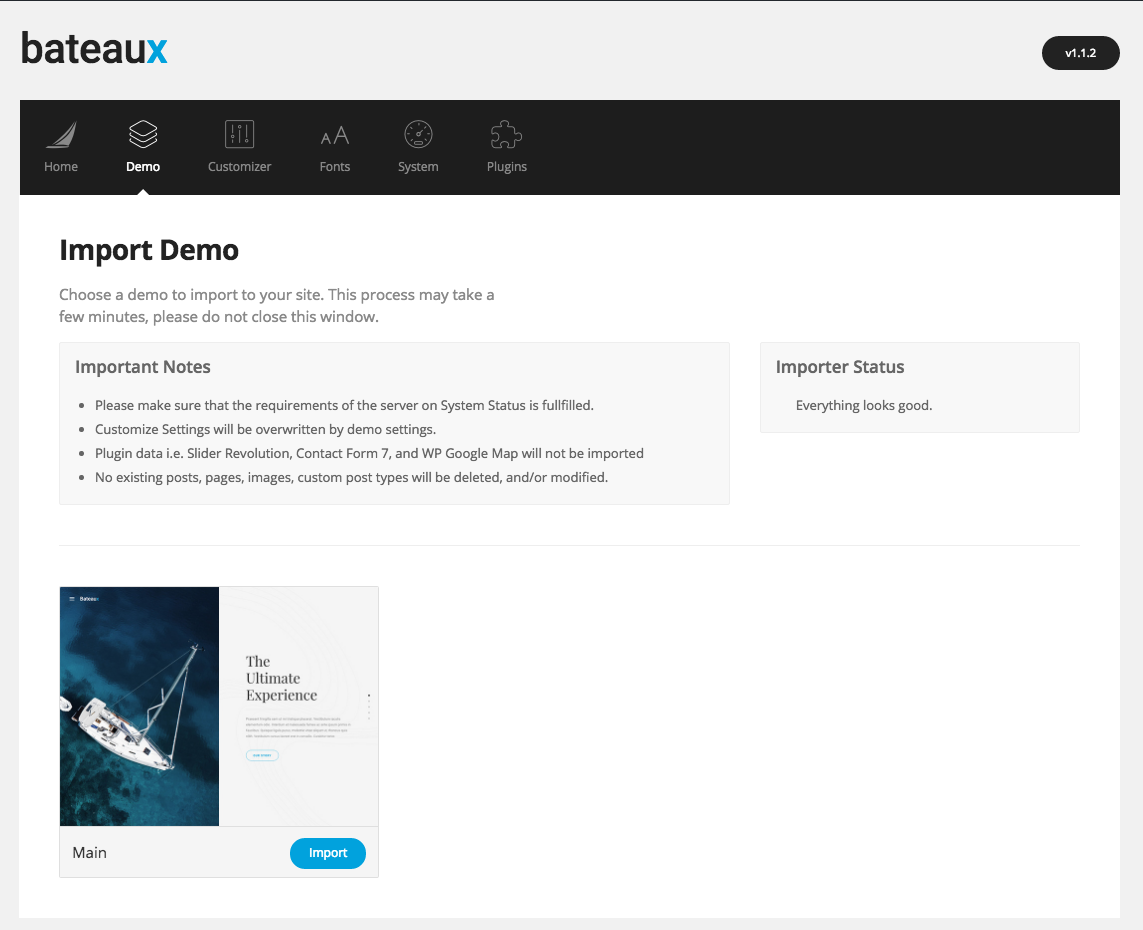
Import Demo
You can easily import demo which show in our site by one click. Go to Dashboard > Bateaux > Bateaux Demos. Choose the demo you want to import to your site then click import. Basically, 'Main' includes all 25 homepages and every pages on the demo site while 'Main (Lite Version)' includes all 25 homepages and some of pages, posts, and portfolios.
Prior to import, we strongly recommend you check the minimum server requirements shown in System Status tab on Bateaux Dashboard. If any of the server setting is below the requirements (shown in red), the error might occur during the import process as we notify you on the importer status box. The process would take a few minutes, so please do not close the window nor navigate away.
There would be two steps during the import: importing menus and importing attachments. If importing menus are done, it means all the data are imported properly except for the images. In case the failure of importing attachments, there would be warning page in which you can choose to retry importing attachments until it finishes.
If you see the errors, please open a ticket on our support forum and send us the access to your site and FTP to your server. The support team will help you as soon as possible.
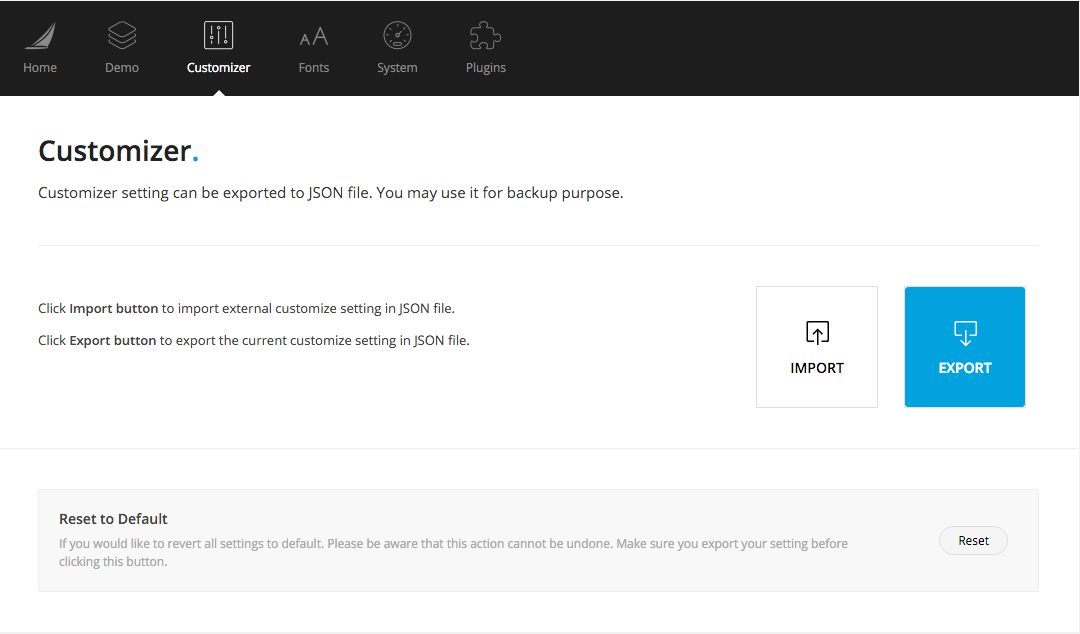
Import/Export Customize
All the theme options (excluded single post options) are able to customize via WordPress Customizer Appearance > Customize. The benefit of using customizer is that user will able to see the change in realtime. Users are able to import / export customize data (color, header and etc.) for the purpose of backing up the site or others by going to Bateaux > Customizer Manager. All the import / export data will be in JSON file format.
- Import : choose your external customize data (JSON file) to import. Note: you are unable to undo this action.
- Export : all the setting will be exported to JSON file, you can use it in any purpose.
- Reset : revert all the settings in customize to theme default settings. Note: you are unable to undo this action.
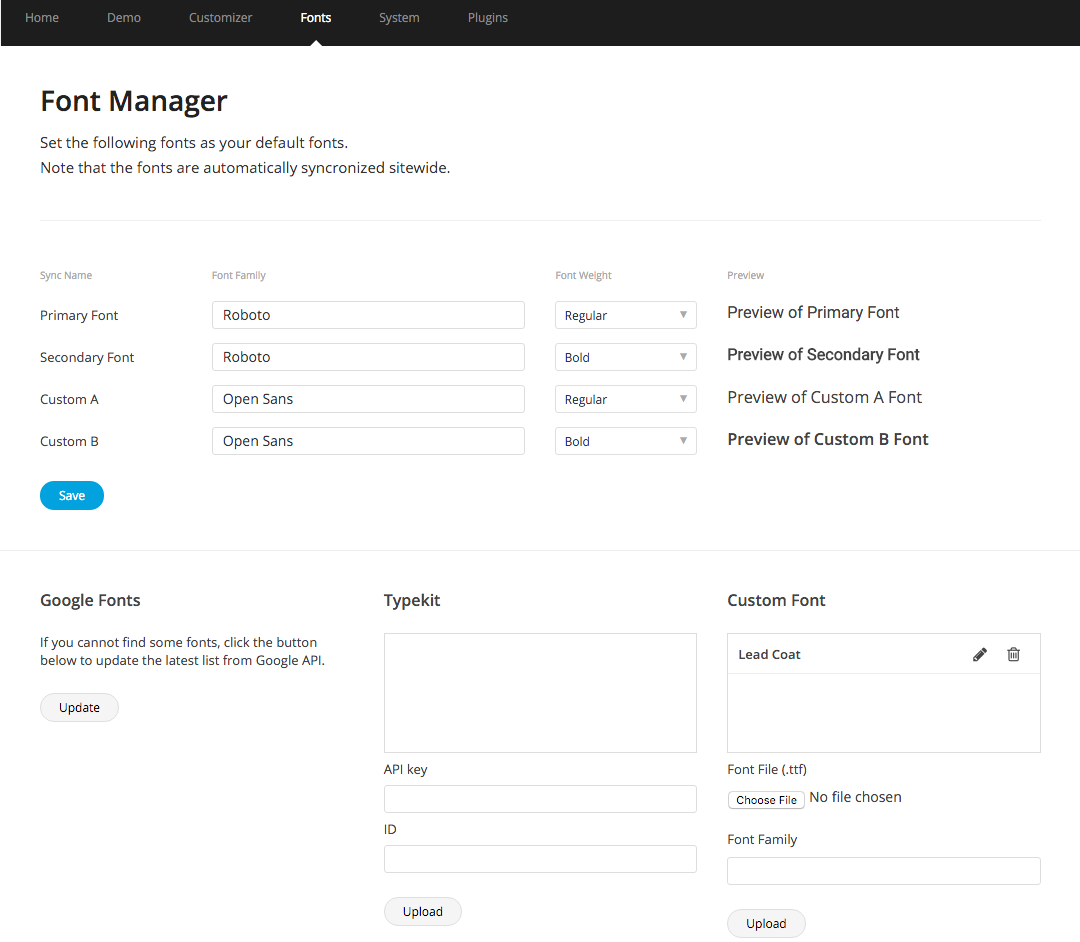
Font setting
User are able to set 5 base fonts (Primary, Secondary, Custom A and Custom B) to use in the site. These 5 fonts will appear in typography options of some elements in page builder (Typography section of the inspector or in customizer typography options. All 5 fonts will be synchronized sitewide. Once you make a change of any property of the font, it will take effect with elements or components which are using that font.
- Primary: apply with the overall font of the site.
- Secondary: apply with some elements, mostly element's title (feature, call to action and etc.).
- Custom A: in case user want to use other font apart from primary and secondary.
- Custom B: in case user want to use other font apart from primary and secondary.
- Custom C: in case user want to use other font apart from primary and secondary.
These 5 types of font user can choose what to use freely. User must choose font-family and font-weight for each font, and there will be preview of the fonts on the right hand side of the selected box.
- Web Safe Fonts: you can check the list of web safe fonts from here. To choose font, type one of font name from the list into the text-input field and the font will show up.
- Google Fonts: type the font family into text input field and list of the google fonts will show up.
- Typekit: input API key and ID then click upload. You can get typekit's API from here. After uploaded, type font family in the text input field and the font will show up.
- Custom Font: choose font file (.ttf or .otf) and input Font Family (not file name ex. 'Lead Coat' not leadcoat) then click upload. User can edit or delete the fonts in case wrongly input.
Warning : After finish setting or changing the fonts, don't forget to click "SAVE", otherwise all the changes won't be applied.
To use these fonts with elements creating in page builder, there might be options in the inspector in section "Typography" or might not. The only way to set the font without typography option is by adding cssClass to the element. Here are the class name use to set the font.
- btx-primary-font: set element's font to Primary font's properties.
- btx-secondary-font: set element's font to Secondary font's properties.
- btx-custom_a-font: set element's font to Custom A font's properties.
- btx-custom_b-font: set element's font to Custom B font's properties.
- btx-custom_c-font: set element's font to Custom C font's properties.
Image Sizes
There are 7 options of image size which you can choose for your image. There are 3 size of images you can edit in admin panel > settings > media. Below are the information of all image sizes.
- Thumbnail is WordPress native size that you can edit. It is cropped to square (default size is
width: 150px,height: 150px) - Medium is WordPress native size that you can edit. (default size is
max-width: 300px,max-height: 300px) - Bateaux Medium is Bateaux image size which is
max-width: 512px. - Medium Large is the WordPress native size but you can't edit. The size is
max-width: 768px,max-height: 768px - Large is WordPress native size that you can edit. (default size is
max-width: 1024px,max-height: 1024px) - Bateaux Large is Bateaux image size which is
max-width: 1280px. - Full is the original image size.
Notice In case you did edit any of the WordPress native sizes (thumbnail, medium, large), all the uploaded images won't be effected. We recommend you to use plugin Regenerate Thumbnails to regenerate the size of images.
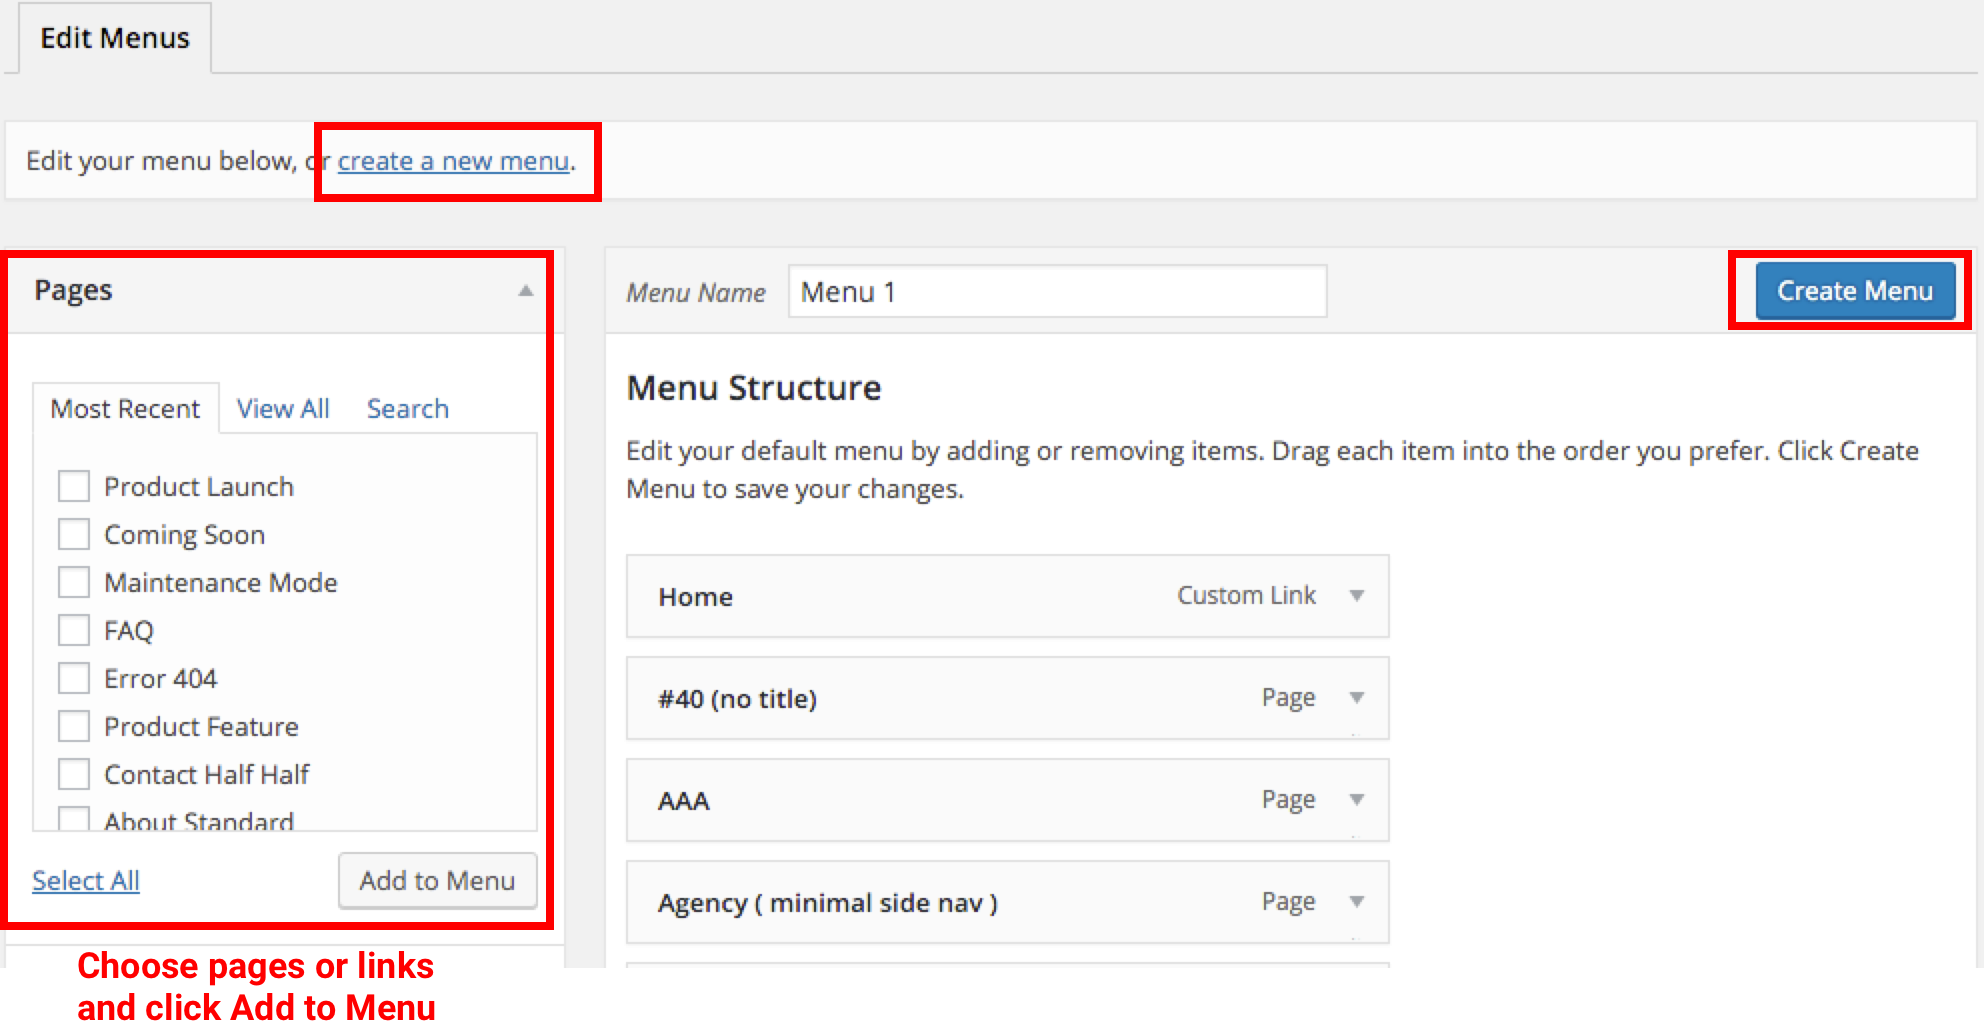
Create Menus
Menu is the main component of the website. Created menu can be used in the header (navigation bar), footer or any sidebar. Bateaux theme allows you to create multi levels submenu and also mega menu. To create menu, go to admin panel Appearance > Menus. If you did import demo, there would be menus show up in the page already, you can easily edit those menus. Here are the basic how to create / edit menus.
Create Menu
Choose the pages / posts or custom links from the left hand side box and add to Menu. Click create menu at the top notice-box or the button on the top right of the page and save menu.
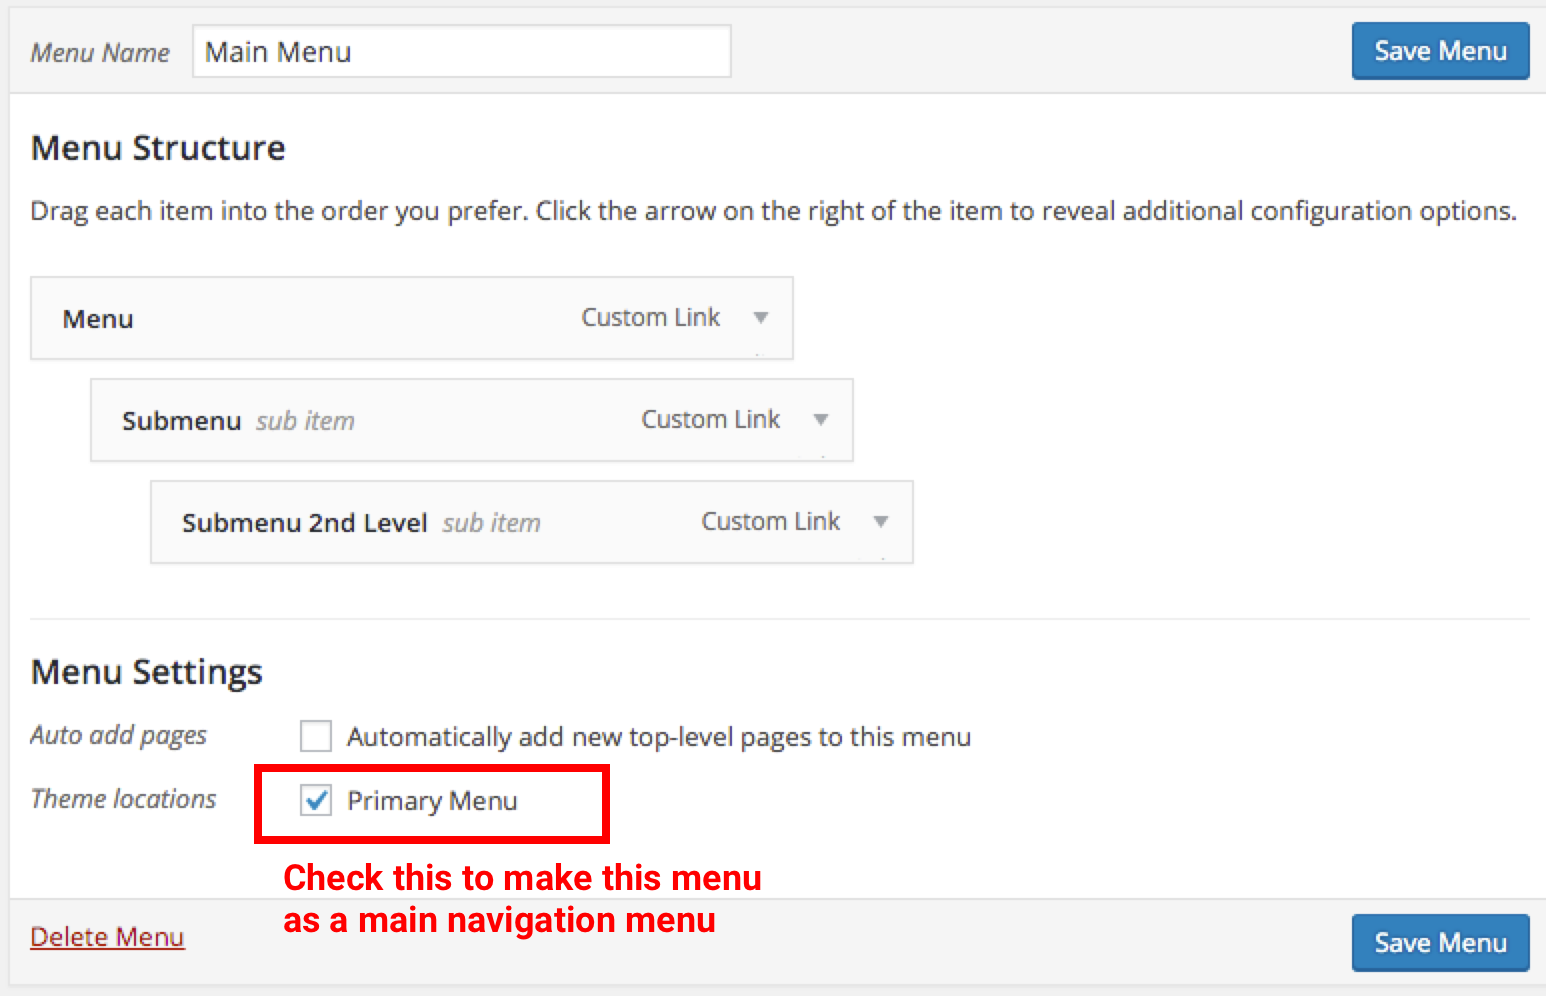
You can set the order of the menu as you want. In the screenshot below, submenu will be under the "Menu" and Submenu 2nd level will be under the Submenu, this is the hierarchy of menus. Check Primary Menu to make the menu as main Navigation Menu then click save. Without clicking save, all the changes will be lost.
Create Mega menu
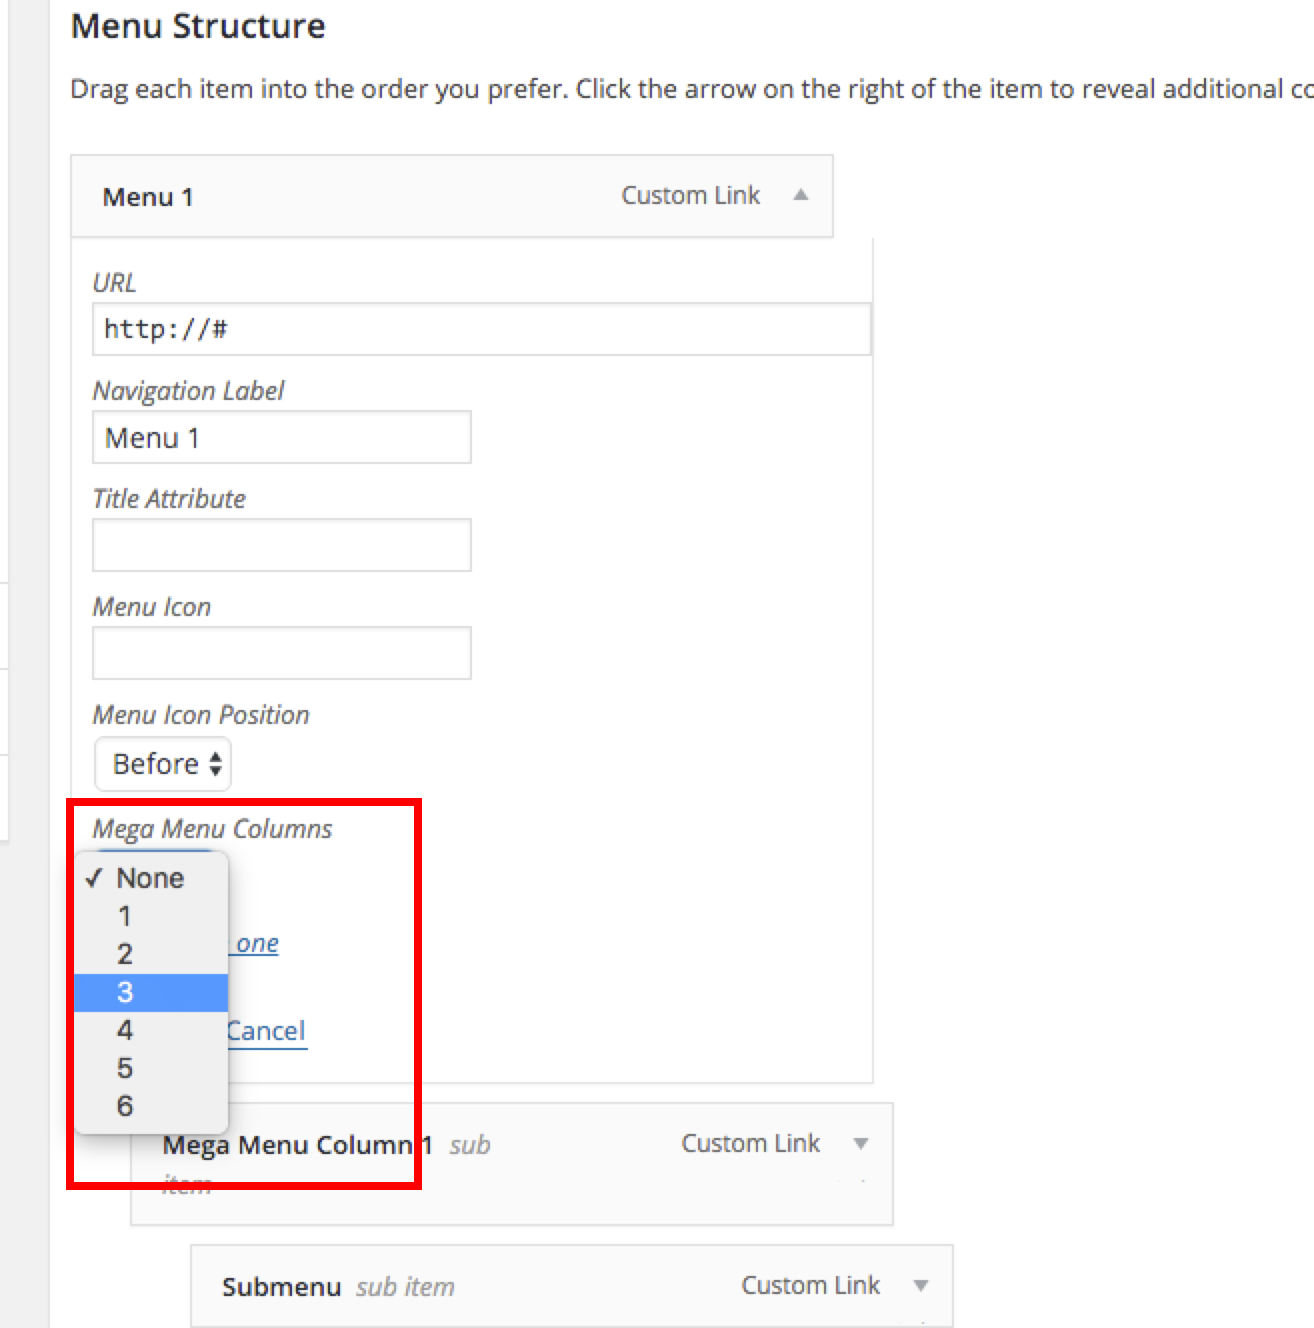
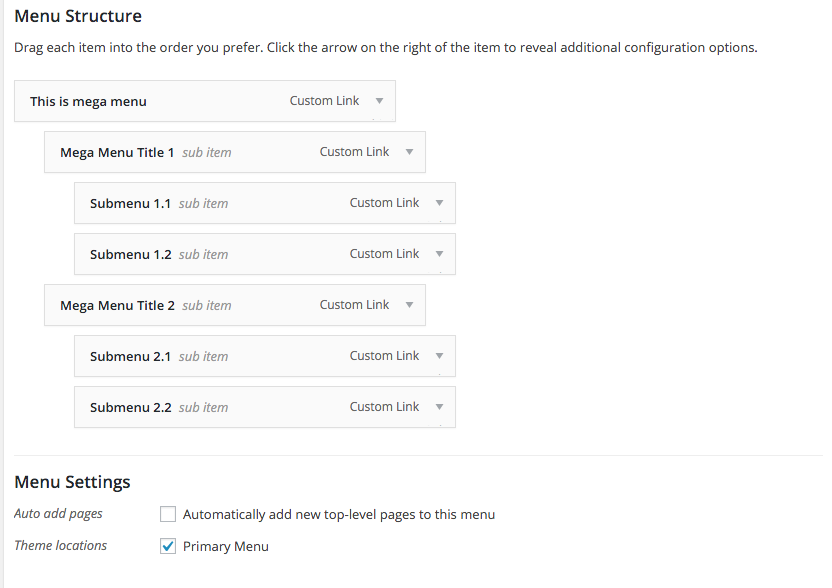
To create multiple columns of mega menu, you can see the example above. The example is 2 columns mega-menu which "submenu 1.1 and 1.2" will be the first column's menus, and "Mega Menu Title 1" will be the title of that column.
Menu Options
There are some options you can edit while creating menus. Main option is the Navigation Label, this is the label display in the site. Moreover you can choose whether to insert the icon before or after the label.
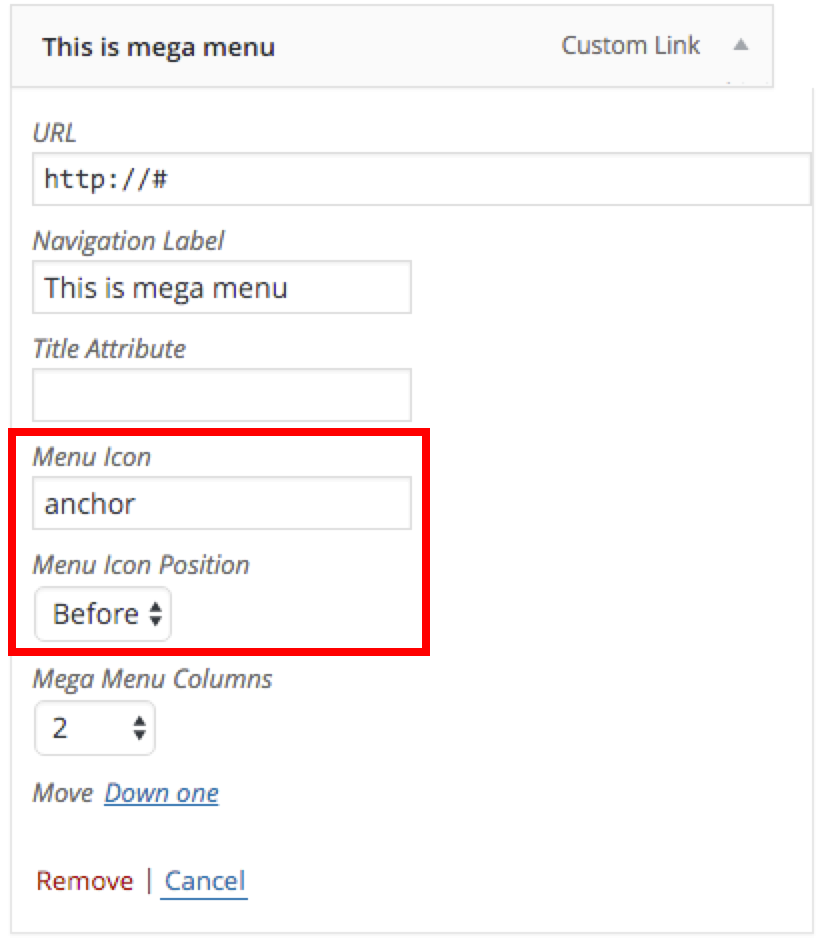
You can search for the icon's name from using icon picker in page builder (element image) which the name will show in Icon ID input form.
Post/Page Excerpt
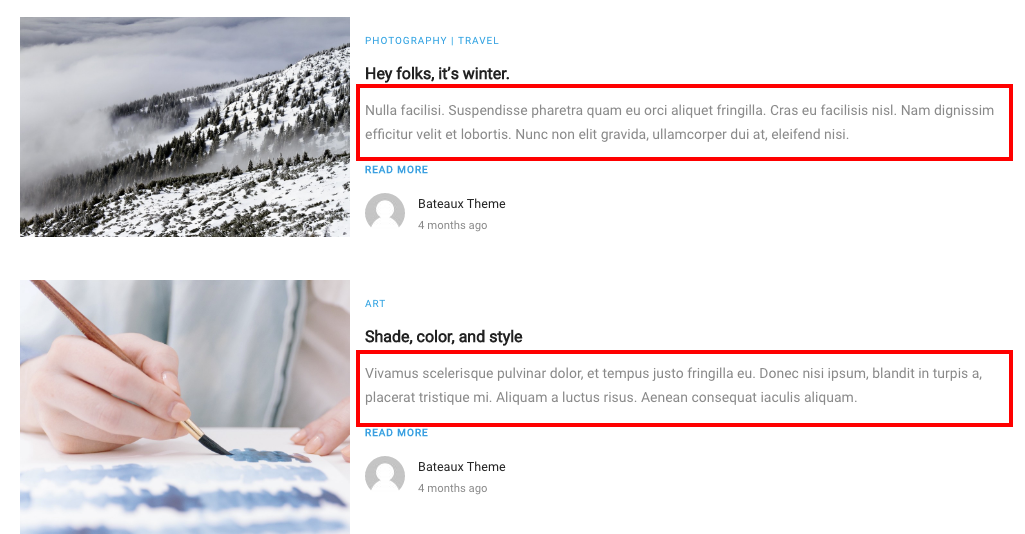 excerpt of page or post entry
1. Input your excerpt into excerpt field. (Recommended) If there is no excerpt field show up in the editor page. Follow the screenshot to enable the excerpt field.
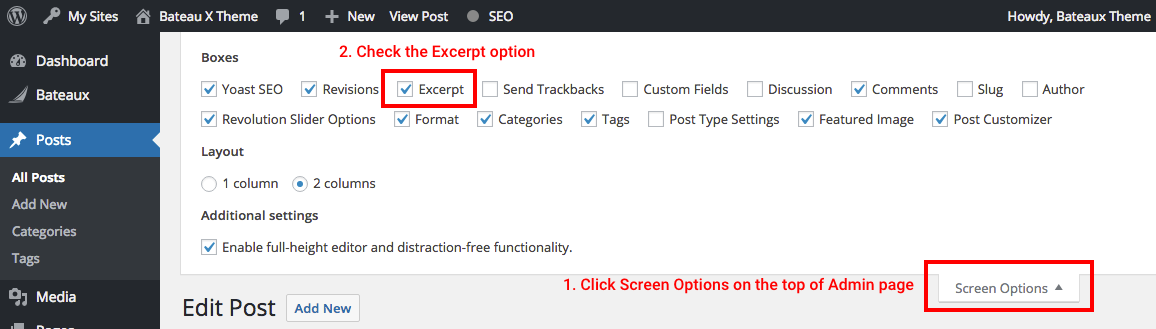
image how to activate excerpt field
2. Use <!--more--> tag in the classic editor.
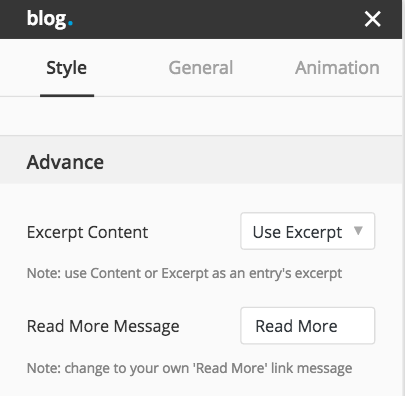
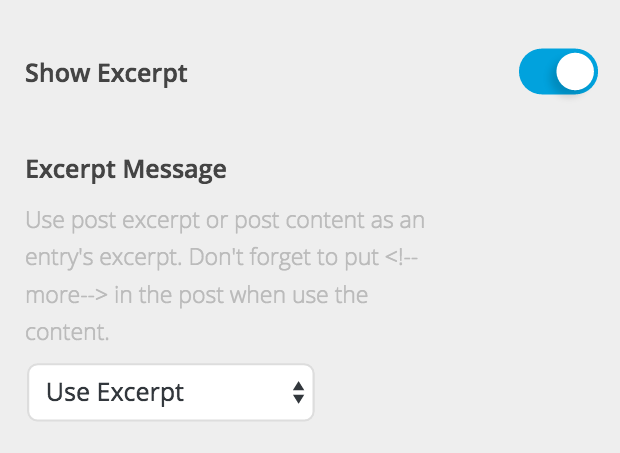
For page or portfolio which you can use page-builder to create, we suggest you to use solution 1 since there is no use to input any content in the classic editor. For the post type "Post" you have an option to choose whether to show post content or post excerpt as an entry's excerpt, where you can find in page builder > element blog's inspector, or in the option for archive blog in Customizer > Archive > Blog section.
 image where
 <!--more--> locate
images where the excerpt option locate